Sometimes the word gate is used and sometimes trigger, and often these are used interchangeably, which can be frickin’ confusing! So, what the hell is the difference? The short answer is, not much, but I’m gonna get into the nuances and explain the subtle differences so you can confidently converse about pulses.
Pulses? WTF? Why did I add a third name? Well, you can think of this kind of like how bourbon is not the same as scotch nor rye, but they are all whiskey. In turn, pulses encapsulate gates, triggers, square waves, and more. Though I rarely see anyone using “pulse” to describe anything but an audio rate variable width square wave. Anyway, a pulse goes up then it goes down.
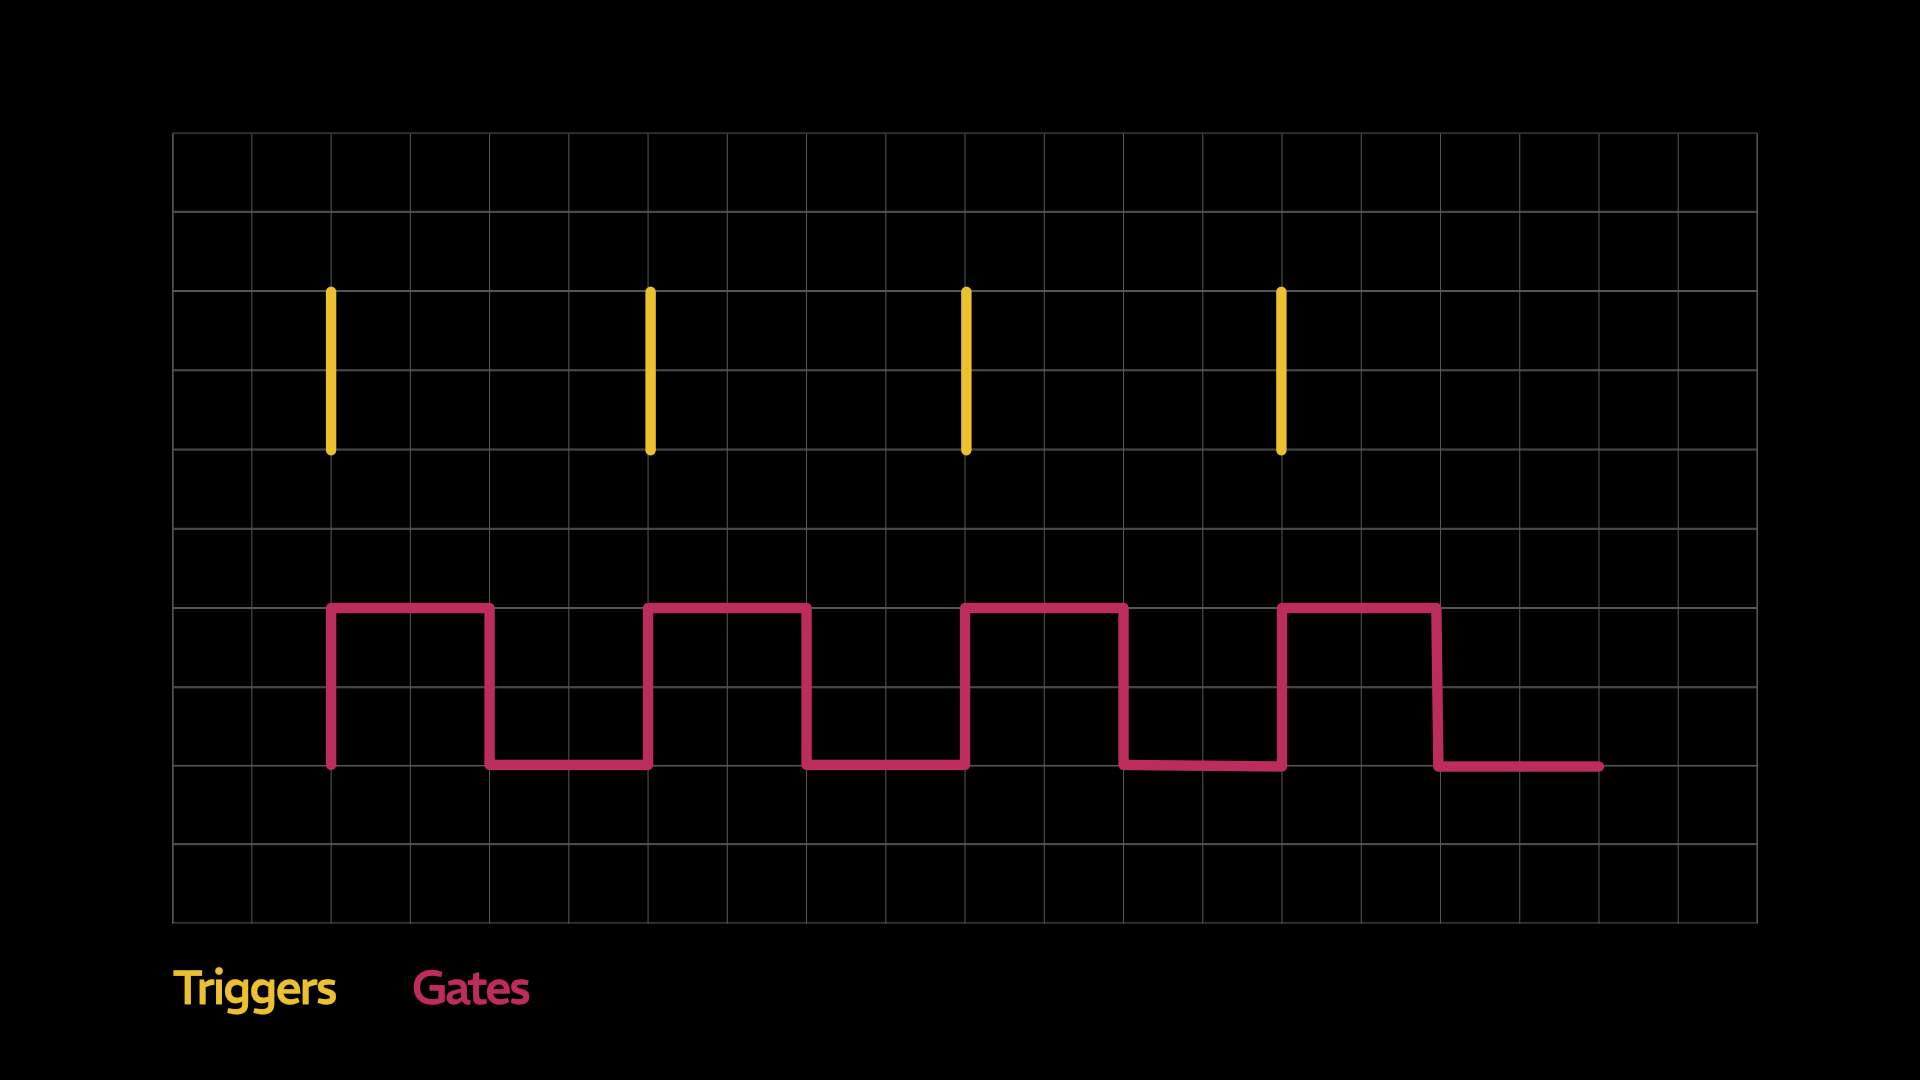
The main diff between gates and triggers is length. A trigger is simply a short gate, really, just a short spike, often less than 10ms in length. A gate is simply a long trigger and can vary in length. That’s it, it isn’t complicated or a code waiting to be deciphered.
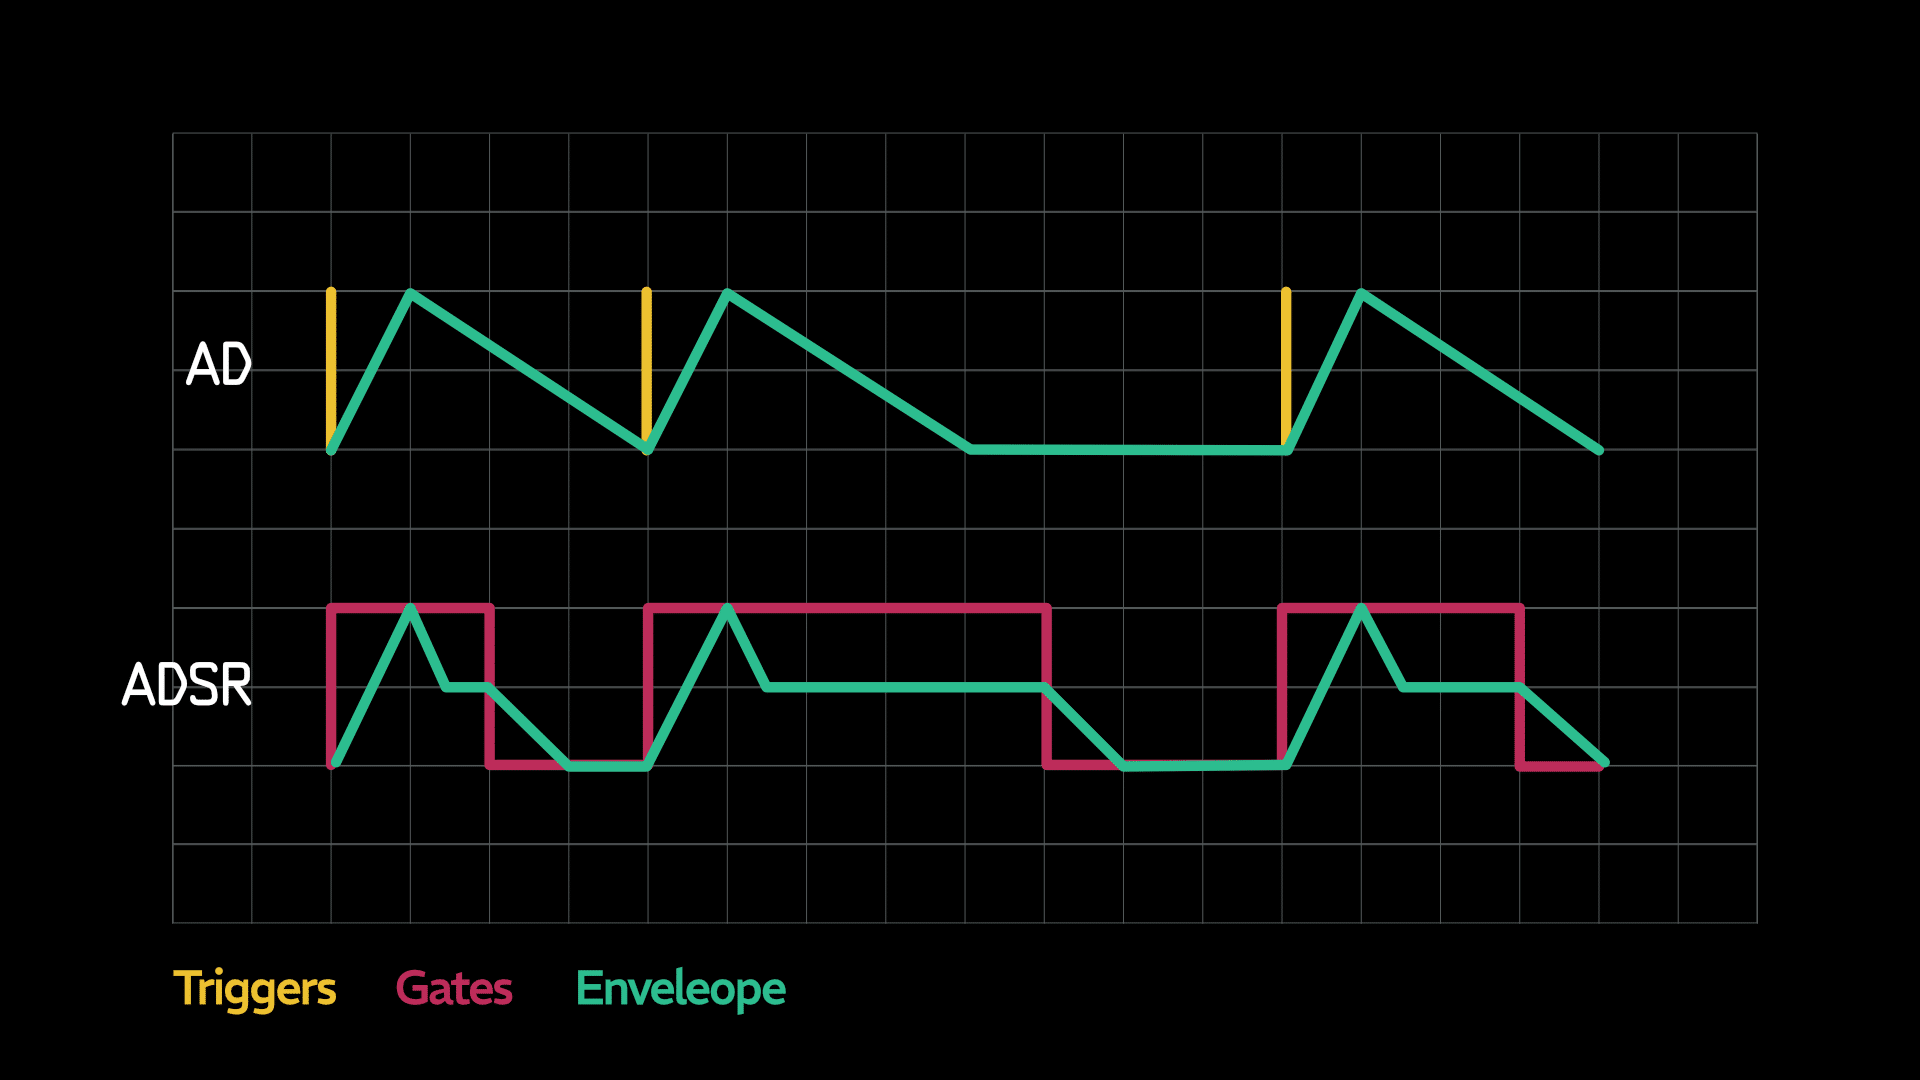
In practice, triggers are what you might use with an AD envelope where the attack and decay times are determined by their respective parameter controls. If you used a trigger with an ASR or ADSR, the result would be an AR or ADR because there is no real length from the trigger; the sustain stage is irrelevant. Triggers are used when length is not a concern or you just want a quick spike.
Alternatively, gates are often used when the length of an event is important. An example of this would be pressing a key down on a keyboard and hearing sound for the duration the key is held. If you used an AD envelope, the gate length would be ignored because there is no sustain stage. While the length of a note when using an ASR or ADSR is determined by the gate length.
The chart below shows a trigger starting an AD envelope and a gate starting an ADSR. Notice how the AD remains the same length no matter when the trigger is received and the ADSR length is determined by the gate length.
It’s dead simple. I only spelled it out so plainly so that anyone could understand the difference.
Patches
Convert Gate to Trigger, Convert Trigger to Gate
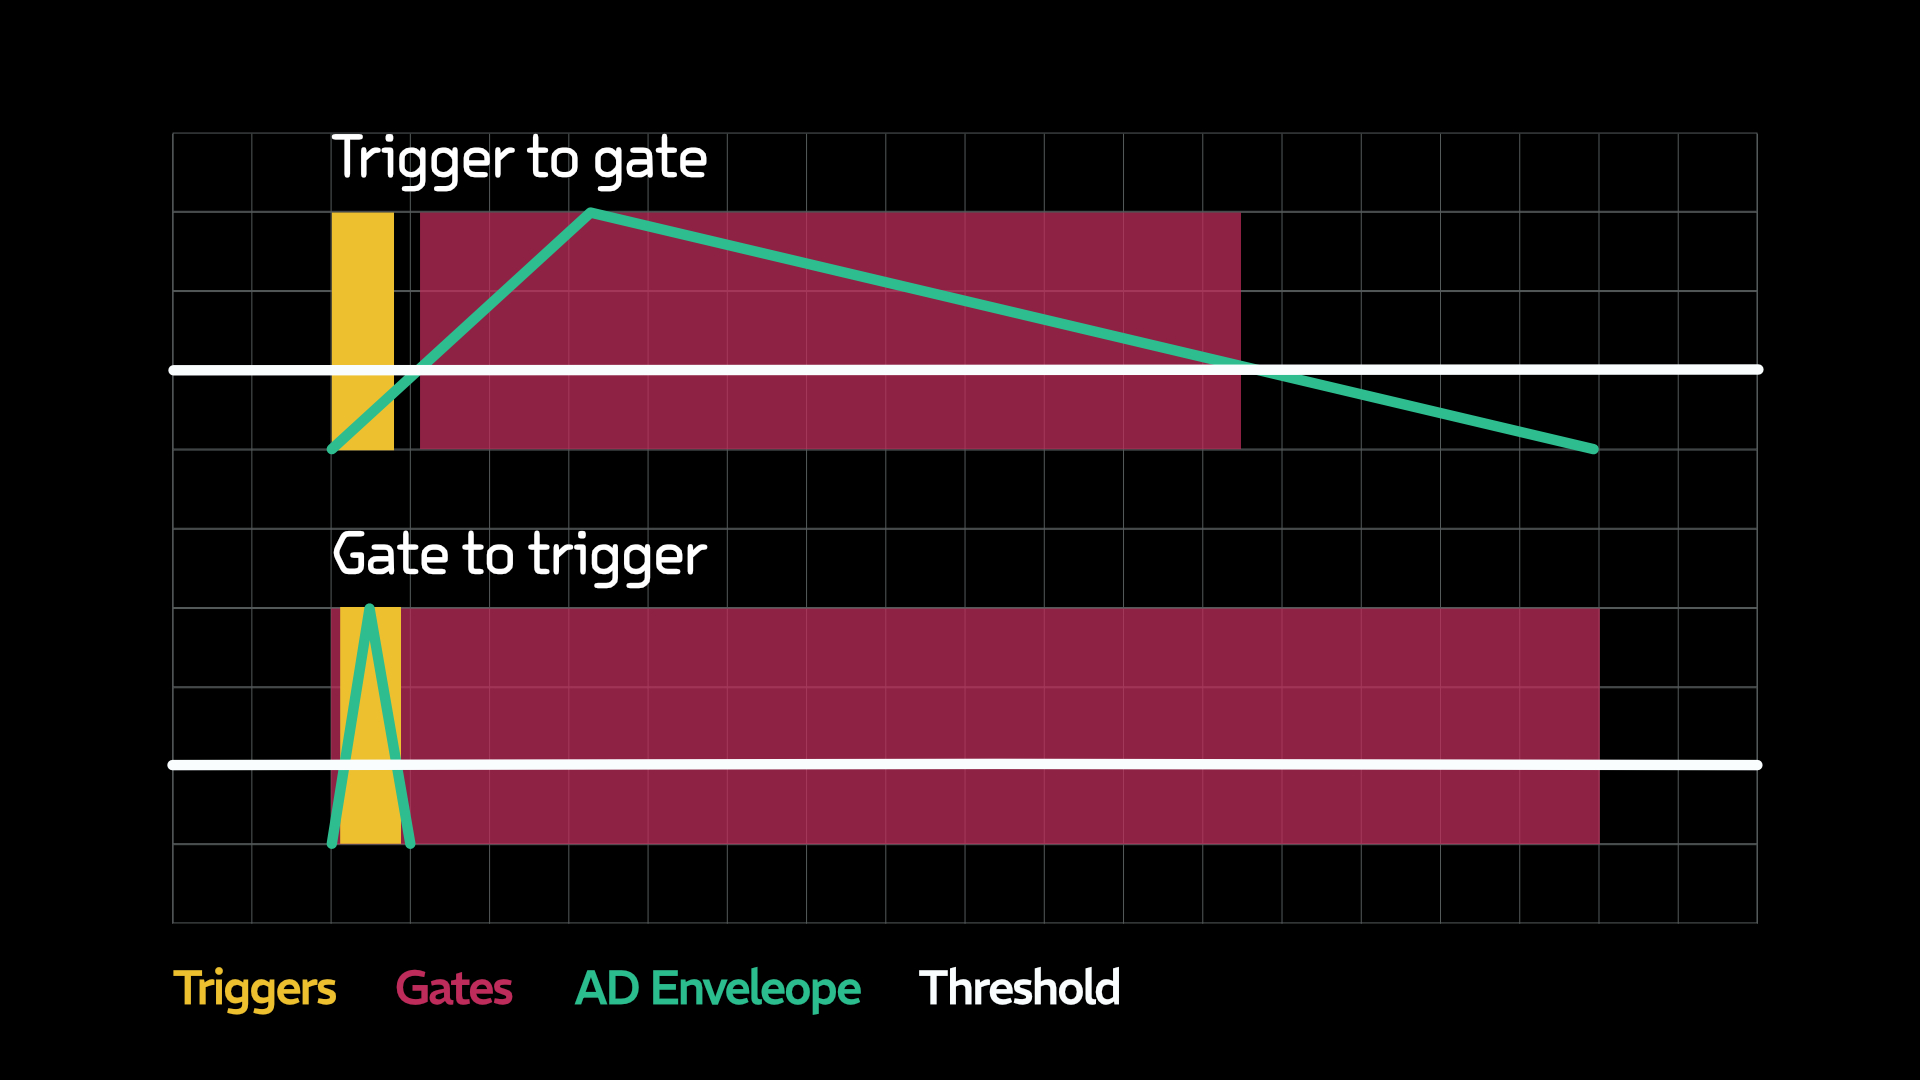
Occasionally you may run into situations where a module or patch requires a trigger input and sometimes a gate. While you could buy a dedicated module to handle the conversion, most AD envelopes can work in a pinch. Earlier I mention how modules with gate inputs require a gate to cross a level threshold to activate. This patch exploits that idea to extend or shorten pulses.

The chart below shows how the length of the AD envelope controls the length of the resulting pulse.
Gate and Trigger Level
Many modules with gate or trigger inputs react when an amplitude threshold is exceeded. An event occurs regardless of the level above the threshold, or nothing happens if the gate level is below. While the threshold varies from module to module, on most envelopes the threshold is pretty low, so even low amplitude gates can usually start an envelope.
Conversely, there are modules like some low pass gates and drum voices that can react dynamically to the level of the gate. You might hear stronger or softer transients depending on the level of the gate. While that seems really cool, how does one generate different level gates? By using The Versatile VCA to modulate the amplitude of the gates.

As of this article’s publication date, the upcoming Steady State Fate Impulse Dynamics module promises to be a powerhouse for managing gate width and level.
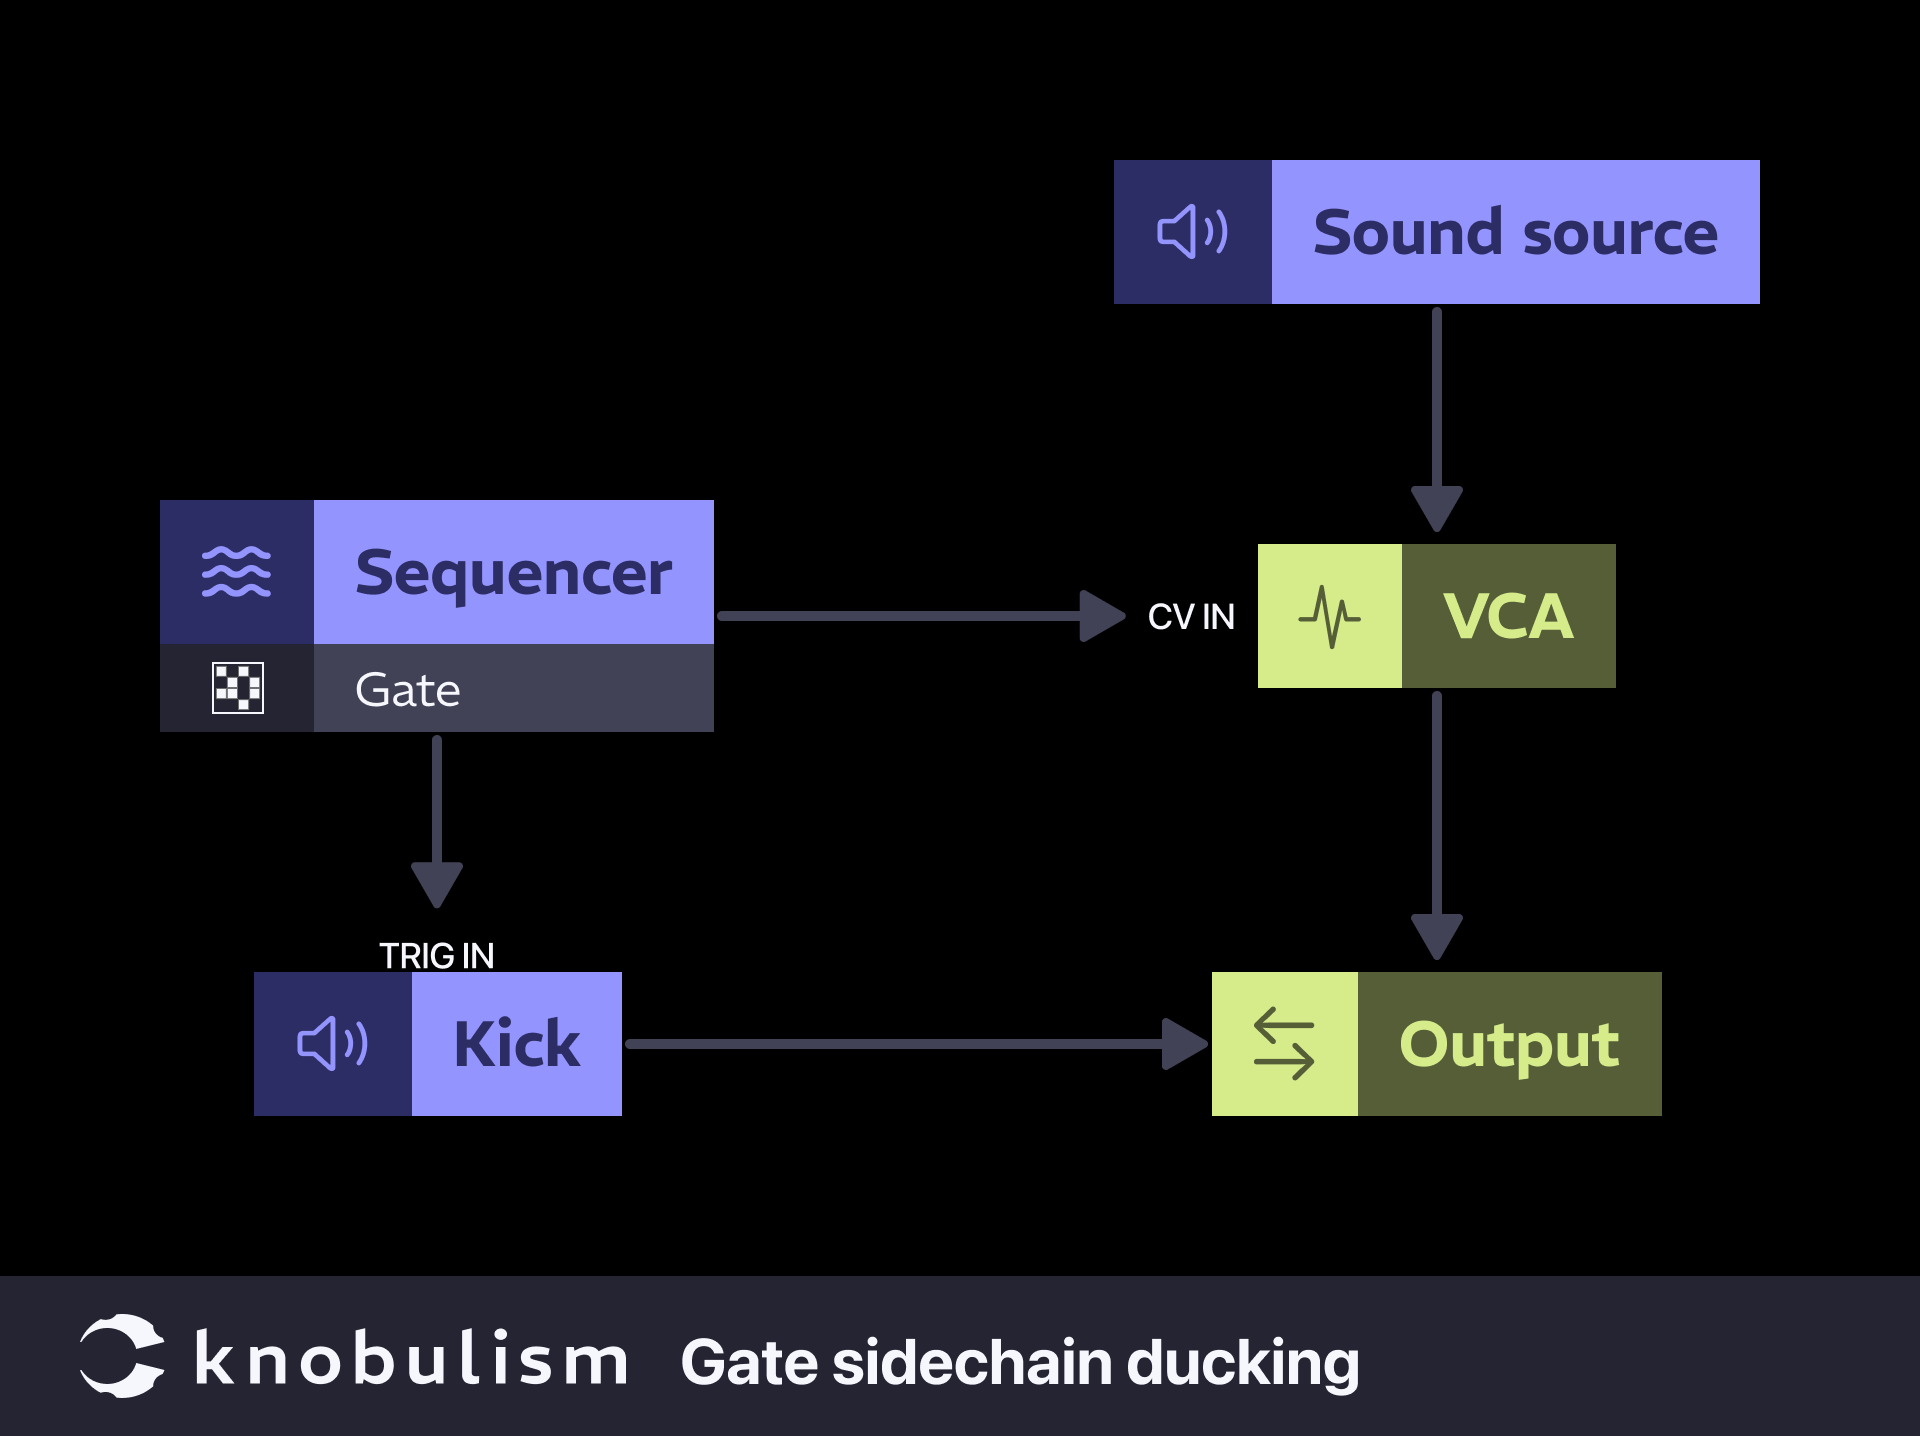
Invert your gates for sidechain ducking
If you do not have an envelope follower, compressor, or extra envelope handy, using an inverted gate is a really quick and dirty way to duck a different part. Use an extra VCA or a filter to reduce a signal while the main signal is active and give it some extra room.
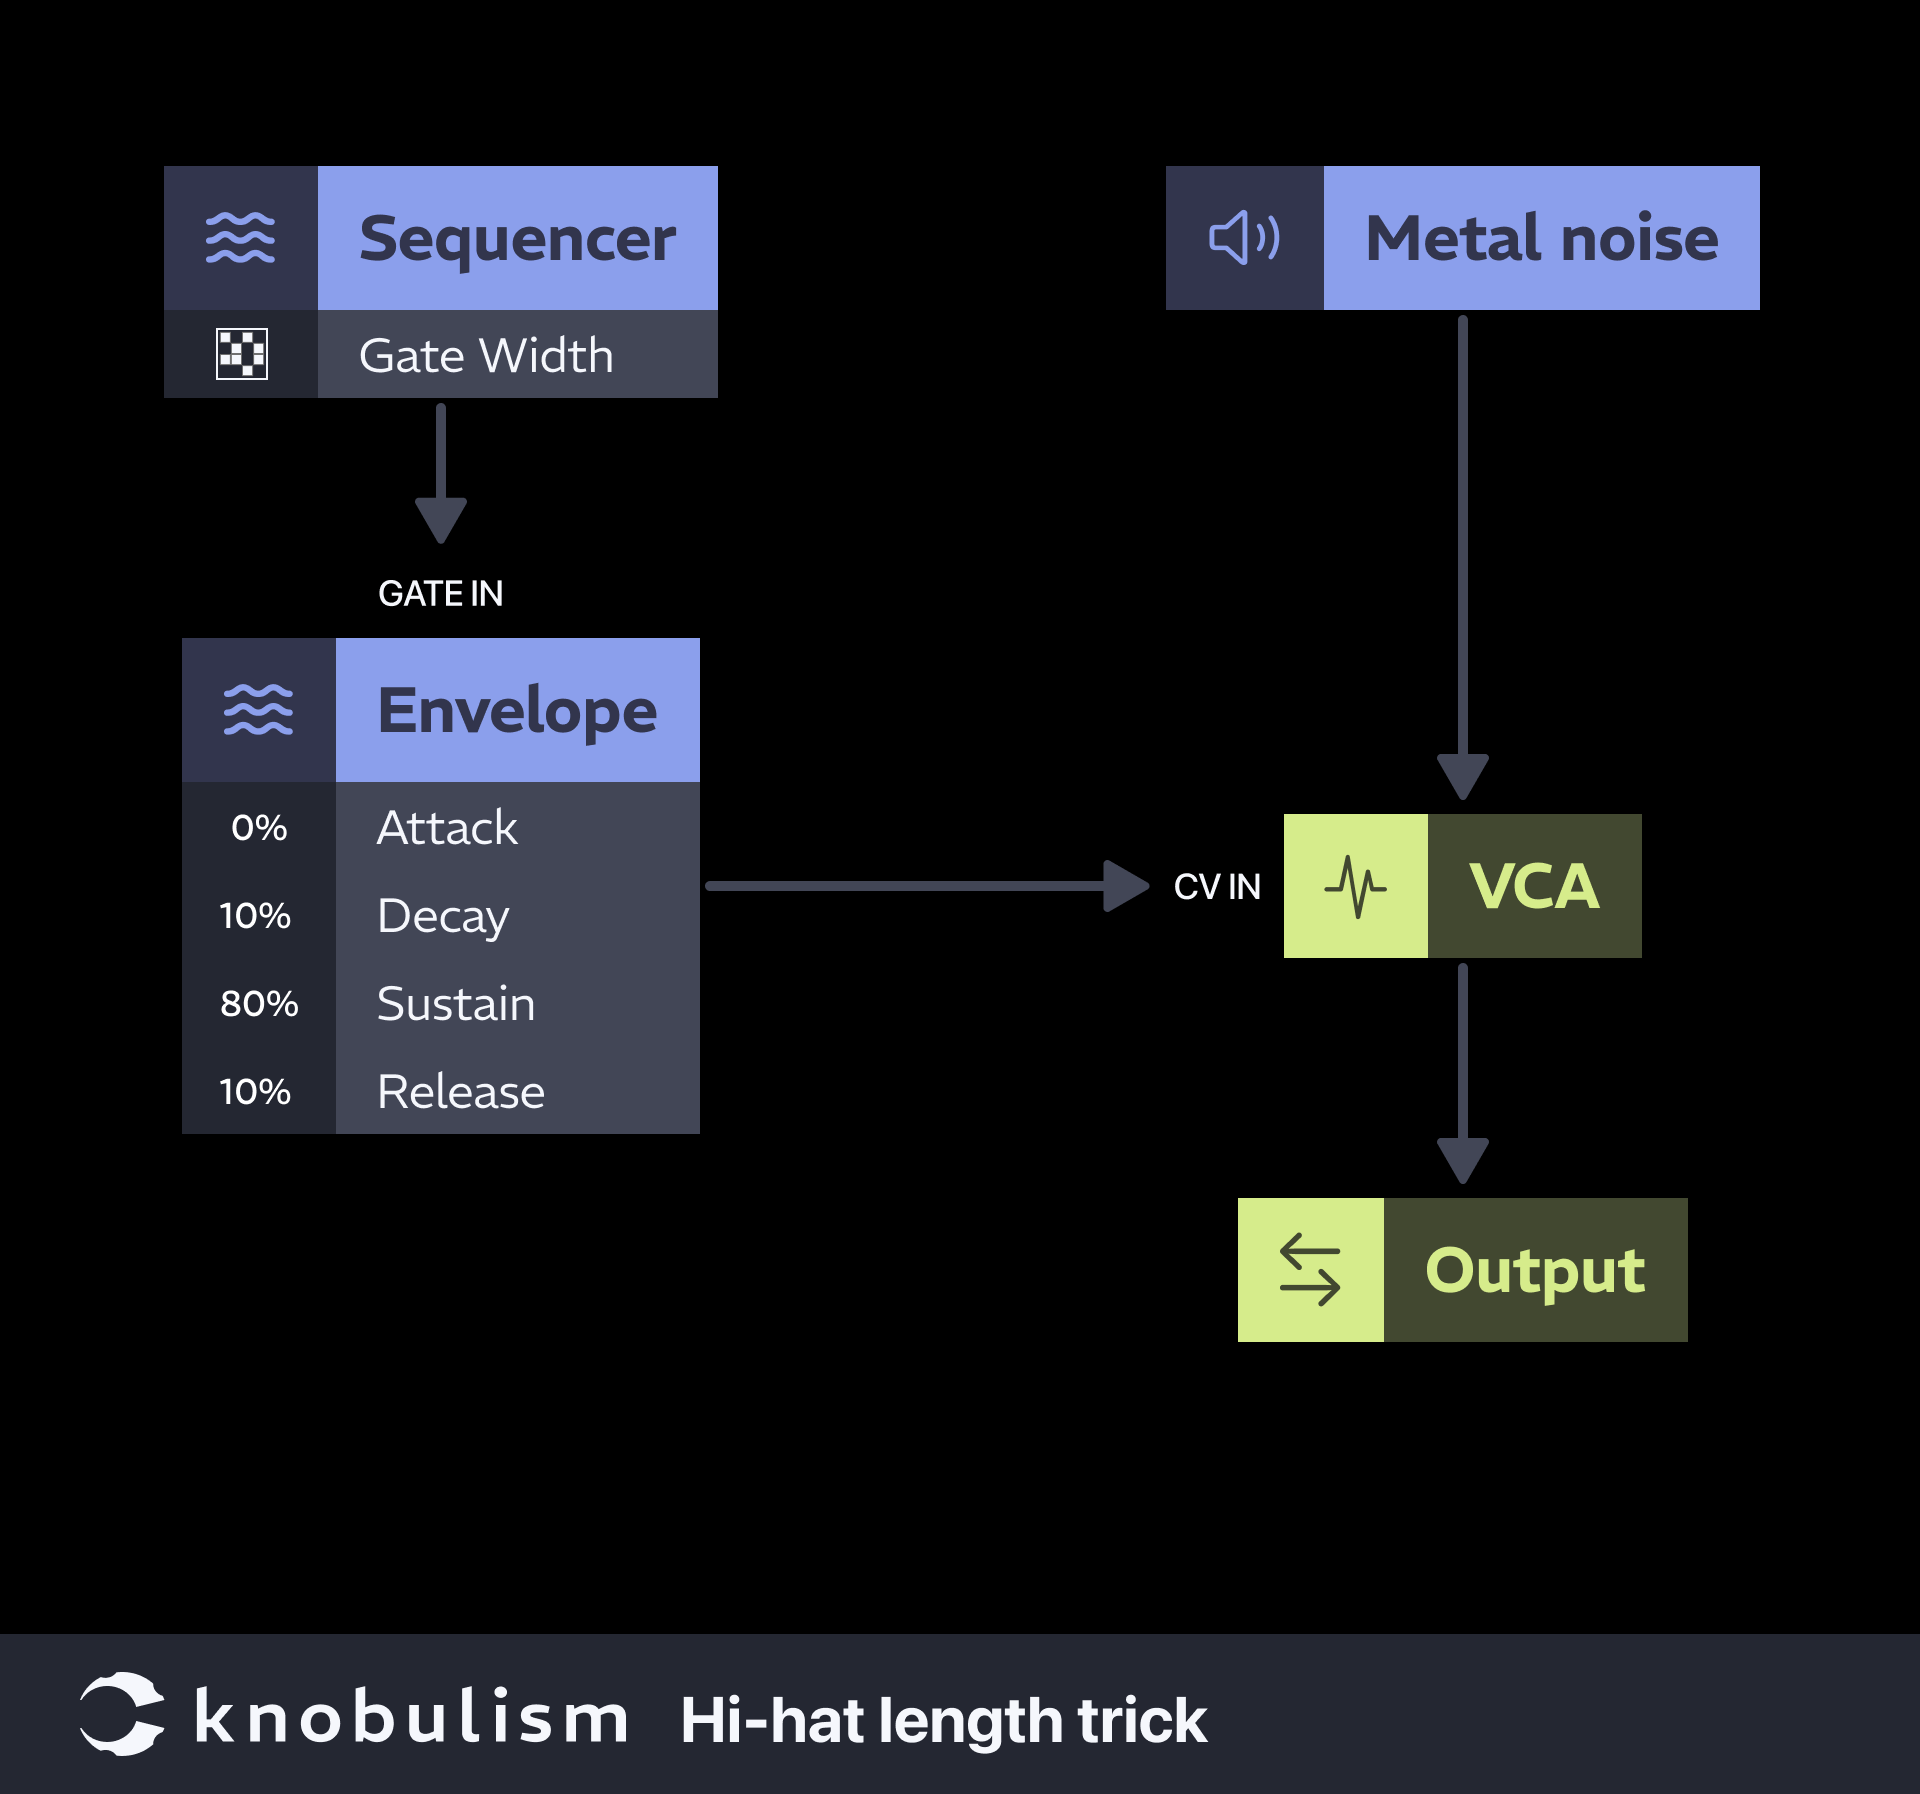
HiHat Length Trick
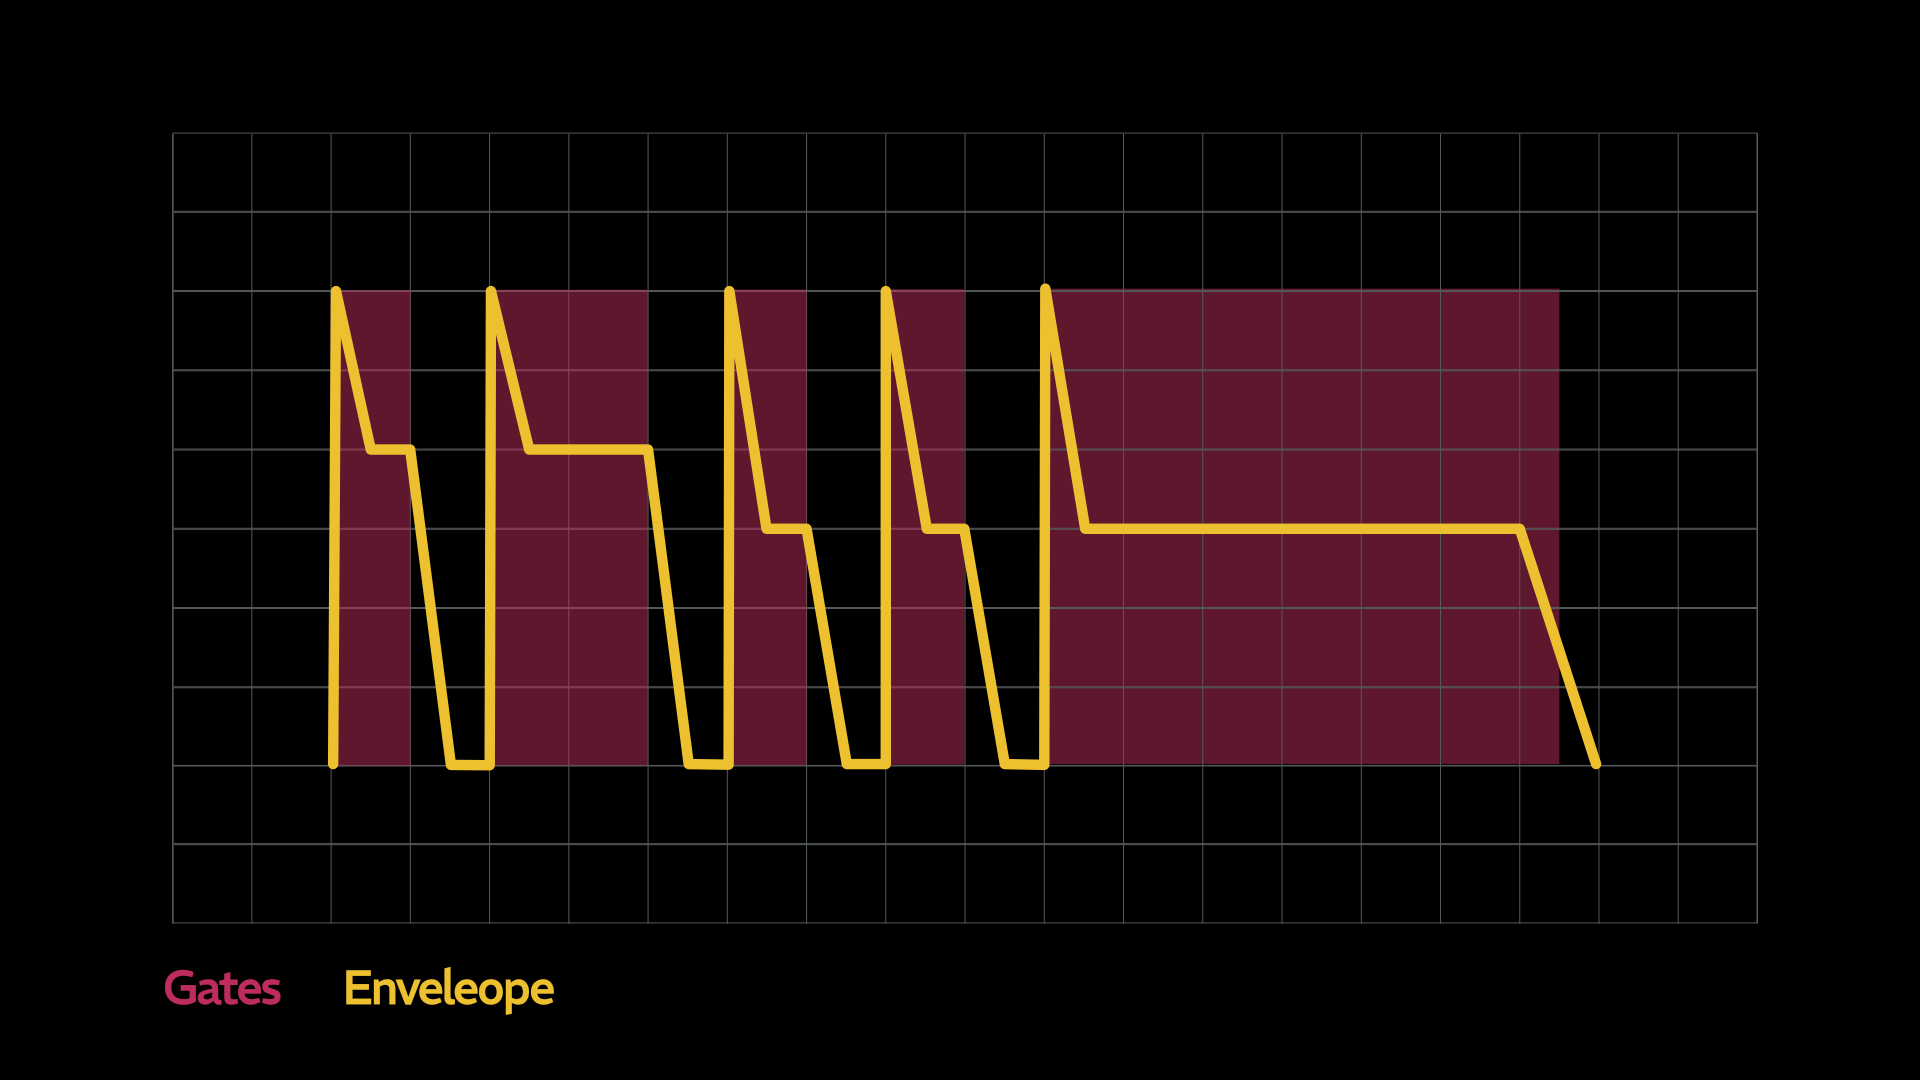
There are many ways to create open and closed hi-hats, most methods require two gate sequences and two envelopes, one gate sequence and envelope for the closed hat events and another set for the open hats. I wanted to program all of this in a single sequence using a single envelope. So I developed a patch that allows precise control over the open hi-hat length. The idea is to hold the hi-hat sound open with the length of a gate. After doing this I wondered why this is such an uncommon approach as it seems way more logical and economical. If you know or have an idea, let me know in the comments. Anyway, here is how it works.
This first chart shows how modifying the gate length in the sequence, creates sustained notes for open hats and shorter for closed. What is particularly cool about this method, is the greater dynamic range than the double gate/env solutions. The double gate/env only have two possible sounds, with my patch you can create many more states of open vs closed.
Synced Random Gates
Did you know you can pretty much use any square wave as a gate source? Yep, a square wave LFO is just a steady stream of gates. We can leverage this idea to create random rhythms without a sequencer. Using one square wave LFO to act as a clock for the CV input of a VCA, you can force any other random gates to sync to the clock.

While I chose a mix of two unsynced square wave LFOs for this example, you should feel free to use any random gate source you like.
Whether you’re using triggers for quick spikes or gates for sustained events, these concepts are fundamental to crafting intricate and dynamic patches. This week, the patch diagrams are simple, but they are definitely meant to be components in a much larger patch. Keep experimenting, and don’t be afraid to explore new ways to integrate these tools into your workflow. Happy patching, and may your synth adventures be ever-inspiring!